
TABLE OF CONTENTS
- Prerequisites
- Tips for new users
- Downloading the template
- Opening the template (for CSV files only)
- Understanding the logic of the template file
- Uploading my template file back into Erplain
- Error messages
Prerequisites
Taxes, Price levels and Currencies are not created by the import. We invite you to create/edit your Taxes, Price levels and Currencies beforehand in Erplain.
In a second time, fill in your file with the existing Tax names, Currencies and Price levels.
Tips for new users
If it is your first time importing customers, we recommend that you start creating a couple of customers manually directly in Erplain. Creating customers manually is more intuitive and gives you a better insight on the existing fields that will eventually turn into column names in the template.
Note: Making mistakes on your first time importing customers is very common.
For your first import, we suggest that you take baby steps and start by importing just a couple customers. Therefore, if you make mistakes, you will be able to re-edit your file much faster.
Downloading the template
Importing customers can be done from the menu Settings > Import data, using the template available in both CSV and XLSX format through the links.
From "Import data", select "Customers" and click on "CSV" or "EXCEL".
Opening the template (for CSV files only)
(If you choose to import your customers using an XLSX file, please move on to the next step)
Once the download is complete, open the file "customer-import-template.csv" with Google Sheets. To learn how to open and save Google Sheets files, we invite you to watch this video:
Warning: Excel, Numbers an a large majority of spreadsheets are not able to run CSV files in accordance with standards and risk corrupting your file. We invite you to systematically use Google Sheet for your imports in CSV.
Understanding the logic of the template file
The logic behind this document relies on five items:
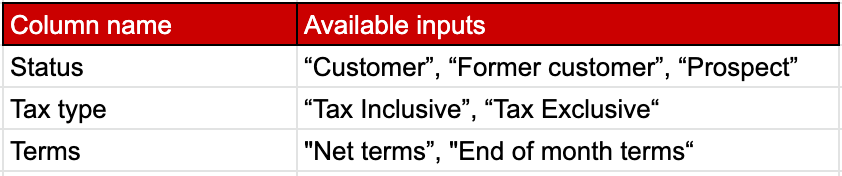
Available inputs: In the columns "Status", "Tax type" and "Terms", it is possible to only fill in a word or a group of words among the available inputs. Here below, you will find all available inputs for the corresponding columns.
Customers: Each customer is represented on a row and has is own ID (Customer ID) and name.
If you have already created customers manually before the import, make sure to use new Names and new Customer IDs for your import.
Customers with multiple addresses: A customer can have multiple addresses, for example, his warehouse address and his office address.
In the case your customer has multiple addresses, simply create a new row for each new address. In this case, simply fill the new address in (Country, Address 1, Address 2, Postal code, City, Location name) leaving the other fields of the row empty.
Taxes: In the column "Tax", the data "HST" corresponds to the tax name that is not to be mixed up with the tax abbreviation.
Countries: Make sure to only use ISO format codes that consist of two letters such as IT, US, UK, FR.
Uploading my template file back into Erplain


Warning: Once your file is selected, click on "Import customers". Do not click on "Update customers".
Error messages
When a mistake is detected in the file, Erplain prevents the file from being uploaded and displays an error message, showing you the mistake to be corrected.
Example, with a customer ID already used:

For more information on importing and updating products, customers and suppliers in Erplain, please refer to this page.